Re-locating Node Zero was never going to be an easy task, but fortunately I already had a location for it to go.
When we’d originally moved into the house, the garage was used to put one of our cars in, but over the years, the car sizes had grown and no longer fitted, so the garage had become more of a workshop / dumping ground.
I decided that a corner of the garage could be used to site the new Node Zero, but was torn in two directions as to what to build there. On the one hand, I now had space for a full height rack of some description, but on the other hand, I felt that some form of cupboard may be more versatile.
I finally settled on building a cupboard, using marine grade ply for the outer walls and I skinned the internal walls with plasterboard and filled the cavity with foam to insulate from cold in the winter and help cooling in the summer. The equipment shelves are again wooden, but they’ve been drilled with 15mm holes to aid air flow between them and they also stop a few inches short of the back wall and front door.
I also fitted a 6″ bathroom extractor fan in the bottom (sucking in) and a 6″ bathroom extractor fan in the top (sucking out) which was ducted to outside the garage – the idea being that cool(er) air from the concrete garage floor would be sucked up through the equipment and hot air sucked out from the top. Both of these fans had the auto opening / closing vents on the front and I controlled them by a simple thermostat in the centre of the rack back wall.
This worked well initially, but as I added more and more equipment to the rack, I really began to struggle with cooling – temperatures would reach 50 degC in the summer three years or so back. At one point I resorted to one of those portable air conditioning units in the garage blowing directly into a hole I cut in the front door at the time (I was pretty desperate at that point). Even this didn’t work very well, and only took a few degrees off of the temperatures at the top of the rack.
Then a couple of years ago, I got speaking to a friend of a friend who was into hydroponics who suggested that bathroom type fans were a waste of time, and what I needed was something that could “replace” the air in the rack as many times as possible in the space of an hour. He suggested looking at the types of fans available for hydroponics as they were designed to do just that.
After some research, I settled on one of these http://tinyurl.com/3x4nrkr (eBay link) – I removed the bathroom extractor fan from the top rack and replaced it with the inline fan. The first time I powered it up, the suction created by the air flow was such that I actually struggled to get the front door open again! I ended up having to introduce some additional venting into the bottom of the rack and the airflow now is phenomenal!
Last summer, with the fan “cycling” in and out as and when needed, I rarely saw temperatures at the top of the rack of over 38 degC – that’s a pretty good drop from 50+
During the cooler months, the fan cycles in and out much less and the temperature at the top of the rack hovers around about 30 degC. This autumn I’m planning on installing some sort of heat exchanger in the duct outlet to attempt to utilize some of the wasted heat elsewhere in the house, perhaps to pre-heat water going to the Combi Boiler.
The image below shows the rack in all it’s glory. On top you can see the ducting and in-line fan and can see the CAT5 cabling coming down from Node One into the top of the rack. Also visible is a PIR from the Security System (there are over 40 PIRs / Magnetic Contact Sensors throughout the house / garage), CCTV Camera, speaker for that all important workshop music (not to mention TTS) and if you look very carefully you can see a couple of aerials for a pair of GSM <-> PSTN gateways. (The yellow CAT5 cables exiting from the front door are temporary while I’m testing some equipment on the workbench).

While I was building the rack, I decided that it would be wise to upgrade the electrics in the garage, both to support the requirements for the new rack and also to allow more workshop type equipment to be easier to power (the garage only had a single double socket and light coming off of the house electrics).
I ran all of the electrics for the rack and garage myself and then a UKHA list member sparkie (happy to recommend him if asked) fitted the consumer unit, carried out final conections and tested it all. The incoming electric supply is now split at the meter and feeds the consumer unit for the garage and consumer unit for the house separately.

Here we can see a “CurrentCost” transmitter with three current clamps – these allow me to track overall electicity, garage / Node Zero electricty and house electricity usage separately. You can also just about make out the sensor I’ve fitted to the electric meter that counts pulses allowing 100% accurate logging of overall electicity usage at the meter.
Towards the front of the garage there’s some more HA related equipment mounted up in the roof space:

I’m a big fan of the RFXCom equipment and you can see a LAN interface that contains 434MHz receiver and transmitter and 868MHz receiver for various HA related protocols such as X10, HomeEasy, Visonic, etc, brought onto the xPL network via the excellent xPLRFX application. You can also see an RFXMeter which contains 3 pulse modules which I have configured to count electricity, gas and water usage at their respective meters. A 1Wire temperature sensor can also just about be seen that runs back over CAT5 to a HA7Net 1Wire Lan interface in the rack. I use 1Wire sensors extensively throughout the house and they have proven both reliable and accurate.

I mentioned that all important workshop music and above you can see a Slim Devices SqueezeBox and an old 2 channel stereo amplifier sat on the workbench. This is configured to power on automatically (note the “HomeEasy” sockets that it’s plugged into) when the garage door is opened and random play lists automatically start playing. What looks like a speaker sat on top of the amplifier, has actually been butchered since it contained a built in 2 channel stereo amplifier – the output from a Slim Devices SqueezeBox Duet Player in the rack is fed to it and it then outputs to speakers in the back garden – great for summer BBQs, and all automatically controllable over the network.

Next up we have a small TouchScreen Tablet PC that is setup at the other end of the workbench. This has proven extremely valuable over the years as although it’s fairly old and slow, it allows media to be watched in the garage while working on more of those un-finished HA projects! Plus it’s useful for research, web browsing, etc and also for configuring various equipment on the network that would otherwise require a trip into the house.
The workbench spans the entire side of the garage and there are plenty of electric sockets for local power of equipment and here we can see the new NAS that I am currently testing with a view to replacing one of the more power hungry servers with.

Below we have the inside of the rack is revealed in all it’s (currently untidy) glory:

One of the reasons I built the rack out of wood was that it’s extremely flexible to mount equipment, make holes for cables, move shelves, etc. As can be seen, although I recently tidied the power cabling, the network cabling is in need of some attention – it’s on the to-do list, honest! The keyboard rack was knocked up out of some offcuts of wood and some old spring hinges and folds flat back to the door when not in use. Note also the re-purposed 15″ TFT – this must now be about 9 years old, long before VESA mounts were common place, so plenty of hack-sawing of the original stand was required to allow it to be mounted on the door! While it only supports 1024*768 resolution, that’s more than enough for simple server configuration duties.
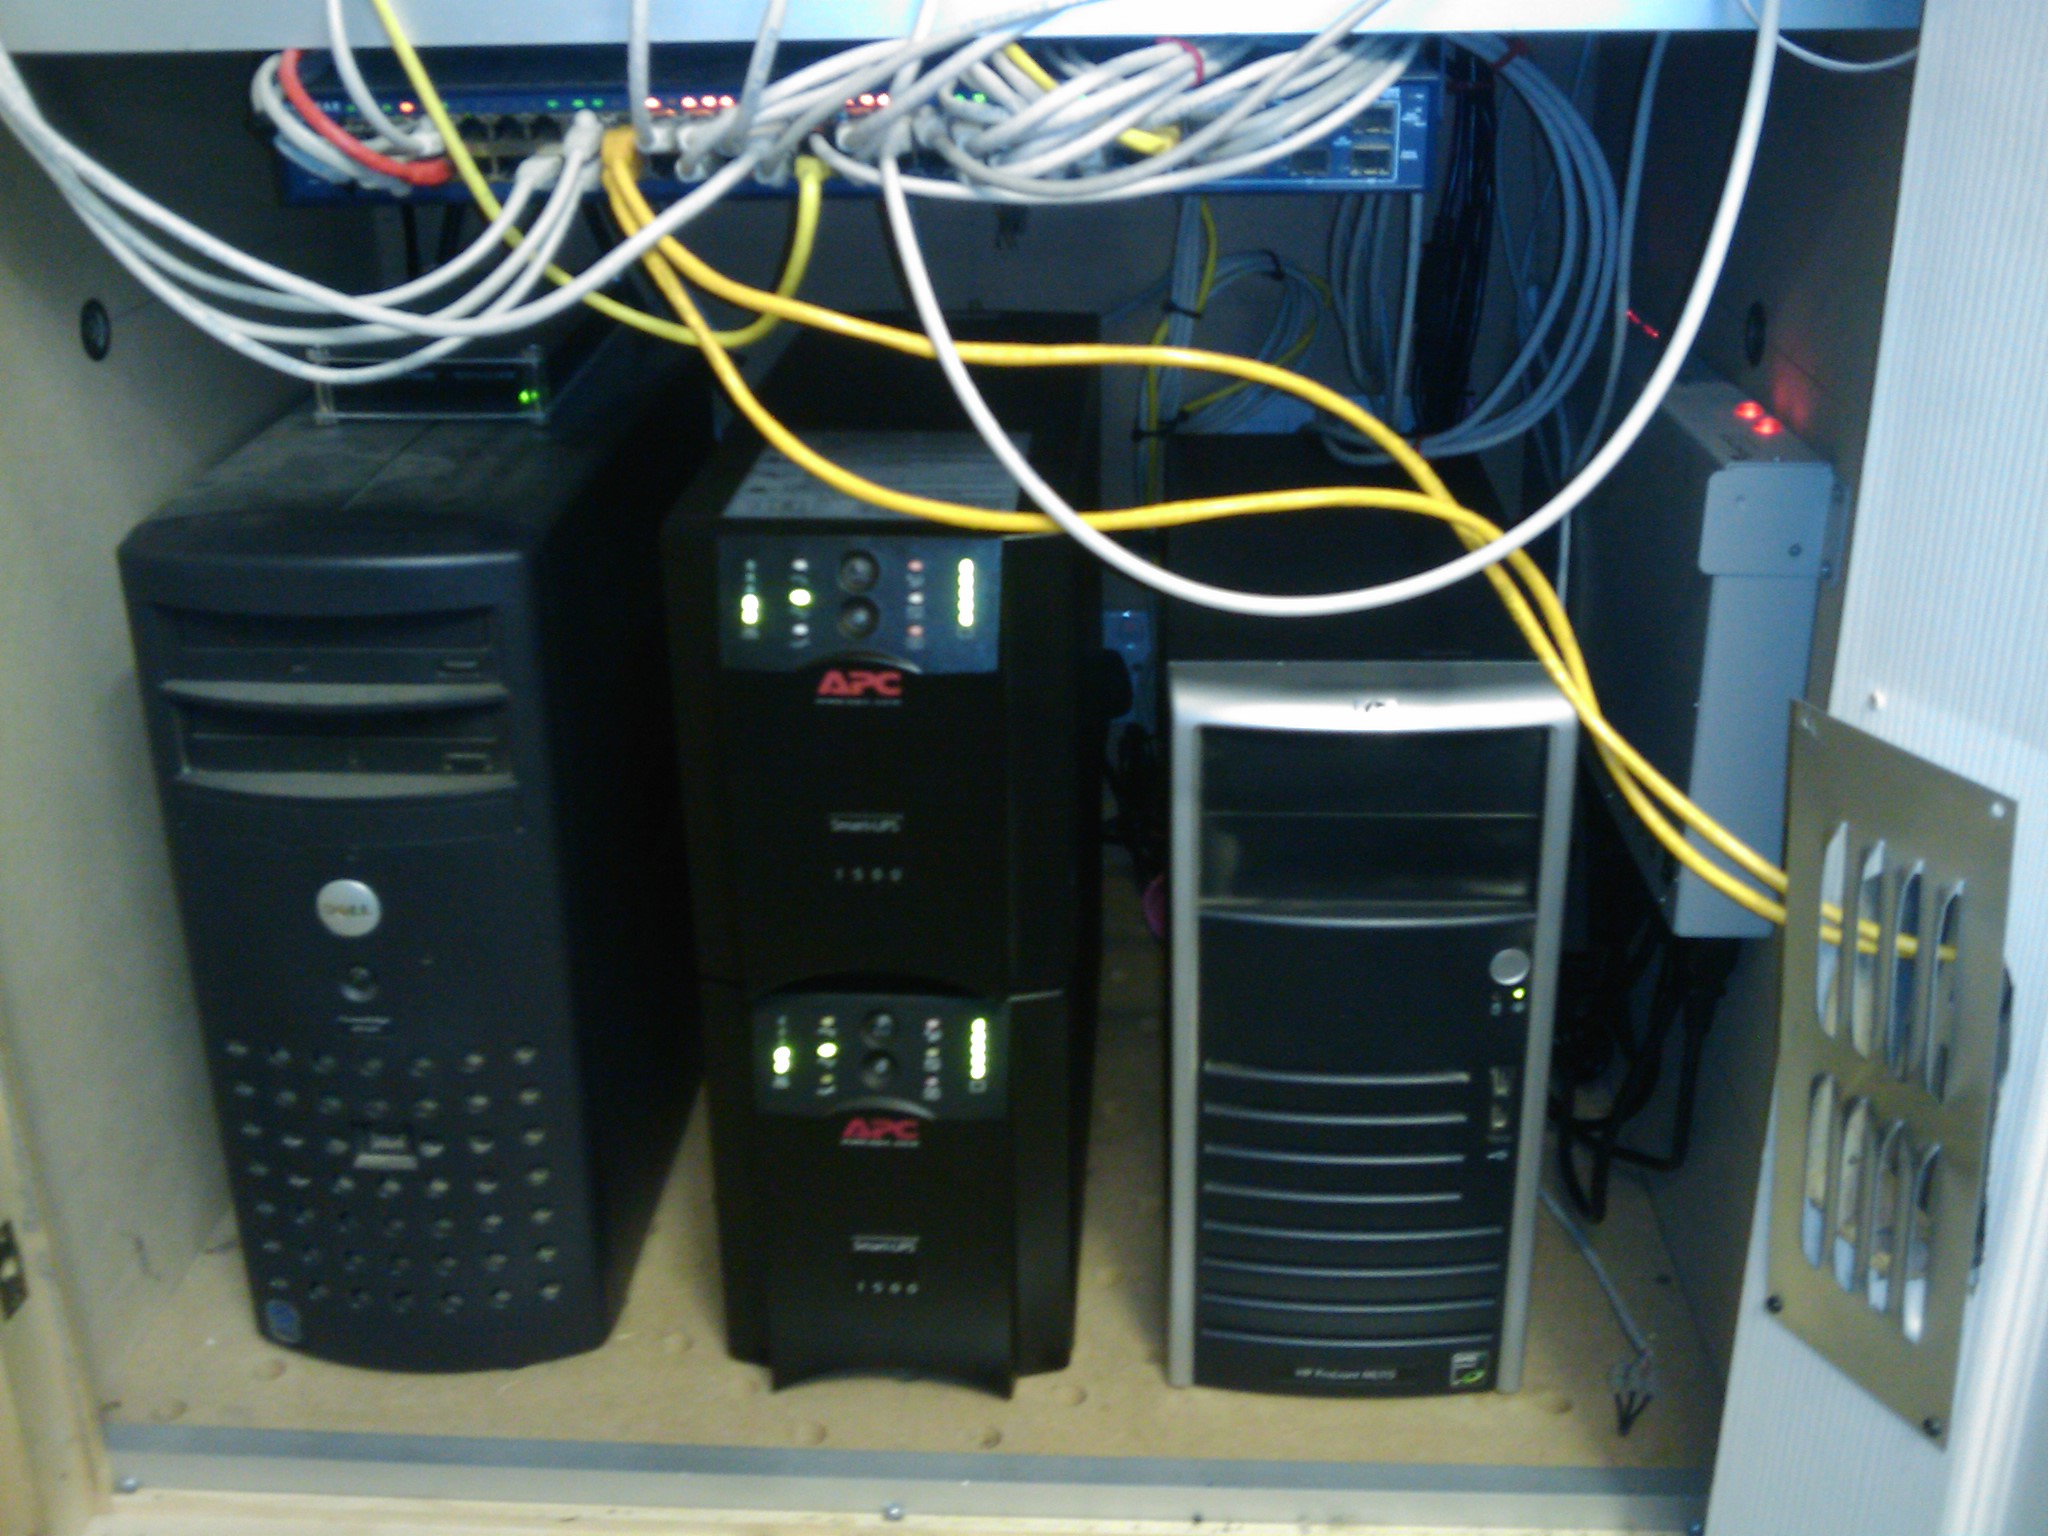
Now we get into the guts of the rack and here we see the bottom of the rack with a couple of APC SmartUPS 1500 models (thanks to another UKHA list member for those). There’s a total of six UPSs around the house / garage and they’re all APC, each having the add-on SNMP cards installed that allow network monitoring directly. These particular UPSs feed into the network controllable PDU on the right hand side and this in turn offers eight controllable outputs (four on each UPS). Power is then fed from here to the main servers and important networking equipment in the rack, with the PDU giving the ability to remotely power cycle equipment if needed. Also in view is a Netgear 48 port Gigabit Smart Switch, which has trunks / lags up to the network switches in Node One. There are also trunks / lags to some of the servers that have multi-port network cards in them, allowing huge network transfer speeds where needed. The server on the left is the main domain controller / mail server and currently runs Windows SBS 2003 – this is due to shortly be migrated to an SBS 2008 Virtual Machine. The server on the right is running VMWare ESXi vSphere and has 2 quad port Gigabit network cards in, 8GB of Ram as well as around 1TB of screamingly fast 15,000RPM SAS hard drives separated out into two RAID0 arrays. Did I mention it was fast? ESXi on this machine is currently hosting half a dozen VMs that serve up various HA related functions including an Asterisk based PBX, xAP and xPL based software (including the excellent xAP Floorplan, which is my main HA control software), mail server firewall and a download quarantine.
Below we have the next shelf up, this has a third server with identical specs to the ESXi server, this time running Ubuntu Linux. It’s main function is to run ZoneMinder for CCTV duties and it has a 16 channel video capture card in it for that purpose. It also runs VMWare Server for Linux and hosts a couple of VMs, one of which serves up the excellent HouseBot HA software that I use to provide various graphical interfaces around the house (most of which are a work in progress I have to say, or “crap” as SWMBO would say!) The other VM is an ISA server which serves as a gateway in / out of the internal network. Next to the server you can see a CCTV Matrix Switch where all the CCTV cameras run through before ending up at the capture card in the server. The output of the Matrix is fed around the house to various TVs over CAT5 and can be controlled via InfraRed in each room (IR -> SqueezeBox -> xAP -> RS232 -> CCTV Matrix). On top of the Matrix can be seen the CurrentCost receiver which is connected over an RS232 <-> Ethernet Gateway to the xAP VM mentioned above where software runs to output the readings over xAP for processing elsewhere. A Rio Receiver provides music for the bathroom over CAT5 via Node One and on top of the Rio the SqueezeBox Duet Player for the back garden speakers can just about be seen. The white box on the right is a CCTV power supply that most of the CCTV cameras are fed from, cutting down on power adapters in the rack. This is capable of supplying 18 12v outputs upto 500ma and I’ve also used it for other 12V equipment too, further reducing power adapters in the rack.

And so onto the next shelf:

A further server with similar specs to the others can be seen on the left – this currently provides storage for media and data backup for the whole network – only around 3TB, small-fry compared to some UKHAers! Previously it also provided PVR capabilities with DVB-C and DVB-T cards, but I’ve since virtualised those functions so the machine is due to be replaced shortly with a low power NAS. It currently also runs VMWare Server for Windows and hosts a few more VMs and one of these has the aforementioned PVR functions using GB-PVR and HDHomeRun DVB-C/DVB-T network tuners and stores recorded TV to a network share. This setup has worked extremely well now since the beginning of the year and the next step is to move the VMs to the ESXi server and retire this machine. Next to this server can be seen a Belkin KVM (bought from eBay for the tidy sum of £1!) which outputs to an Adderlink IPEPS, a VGA over CAT5 extender and to the 15″ TFT on the back of the door. The IPEPS offers KVM over IP, effectively offering a VNC session to the Belkin KVM from anywhere on the network and the VGA over CAT5 extender runs up to the office / guestroom (or guestroom / office as SWMBO would say!) The two HDHomeRun network tuners can be seen here too, along with a GrandStream 4 port FXS Gateway, which brings two PSTN lines and two GSM lines over SIP into the Asterisk PBX. Just about visible in the background is the HA7Net 1Wire Lan interface and a small 12-port patch panel for daisy-chaining 1Wire sensors over CAT5.
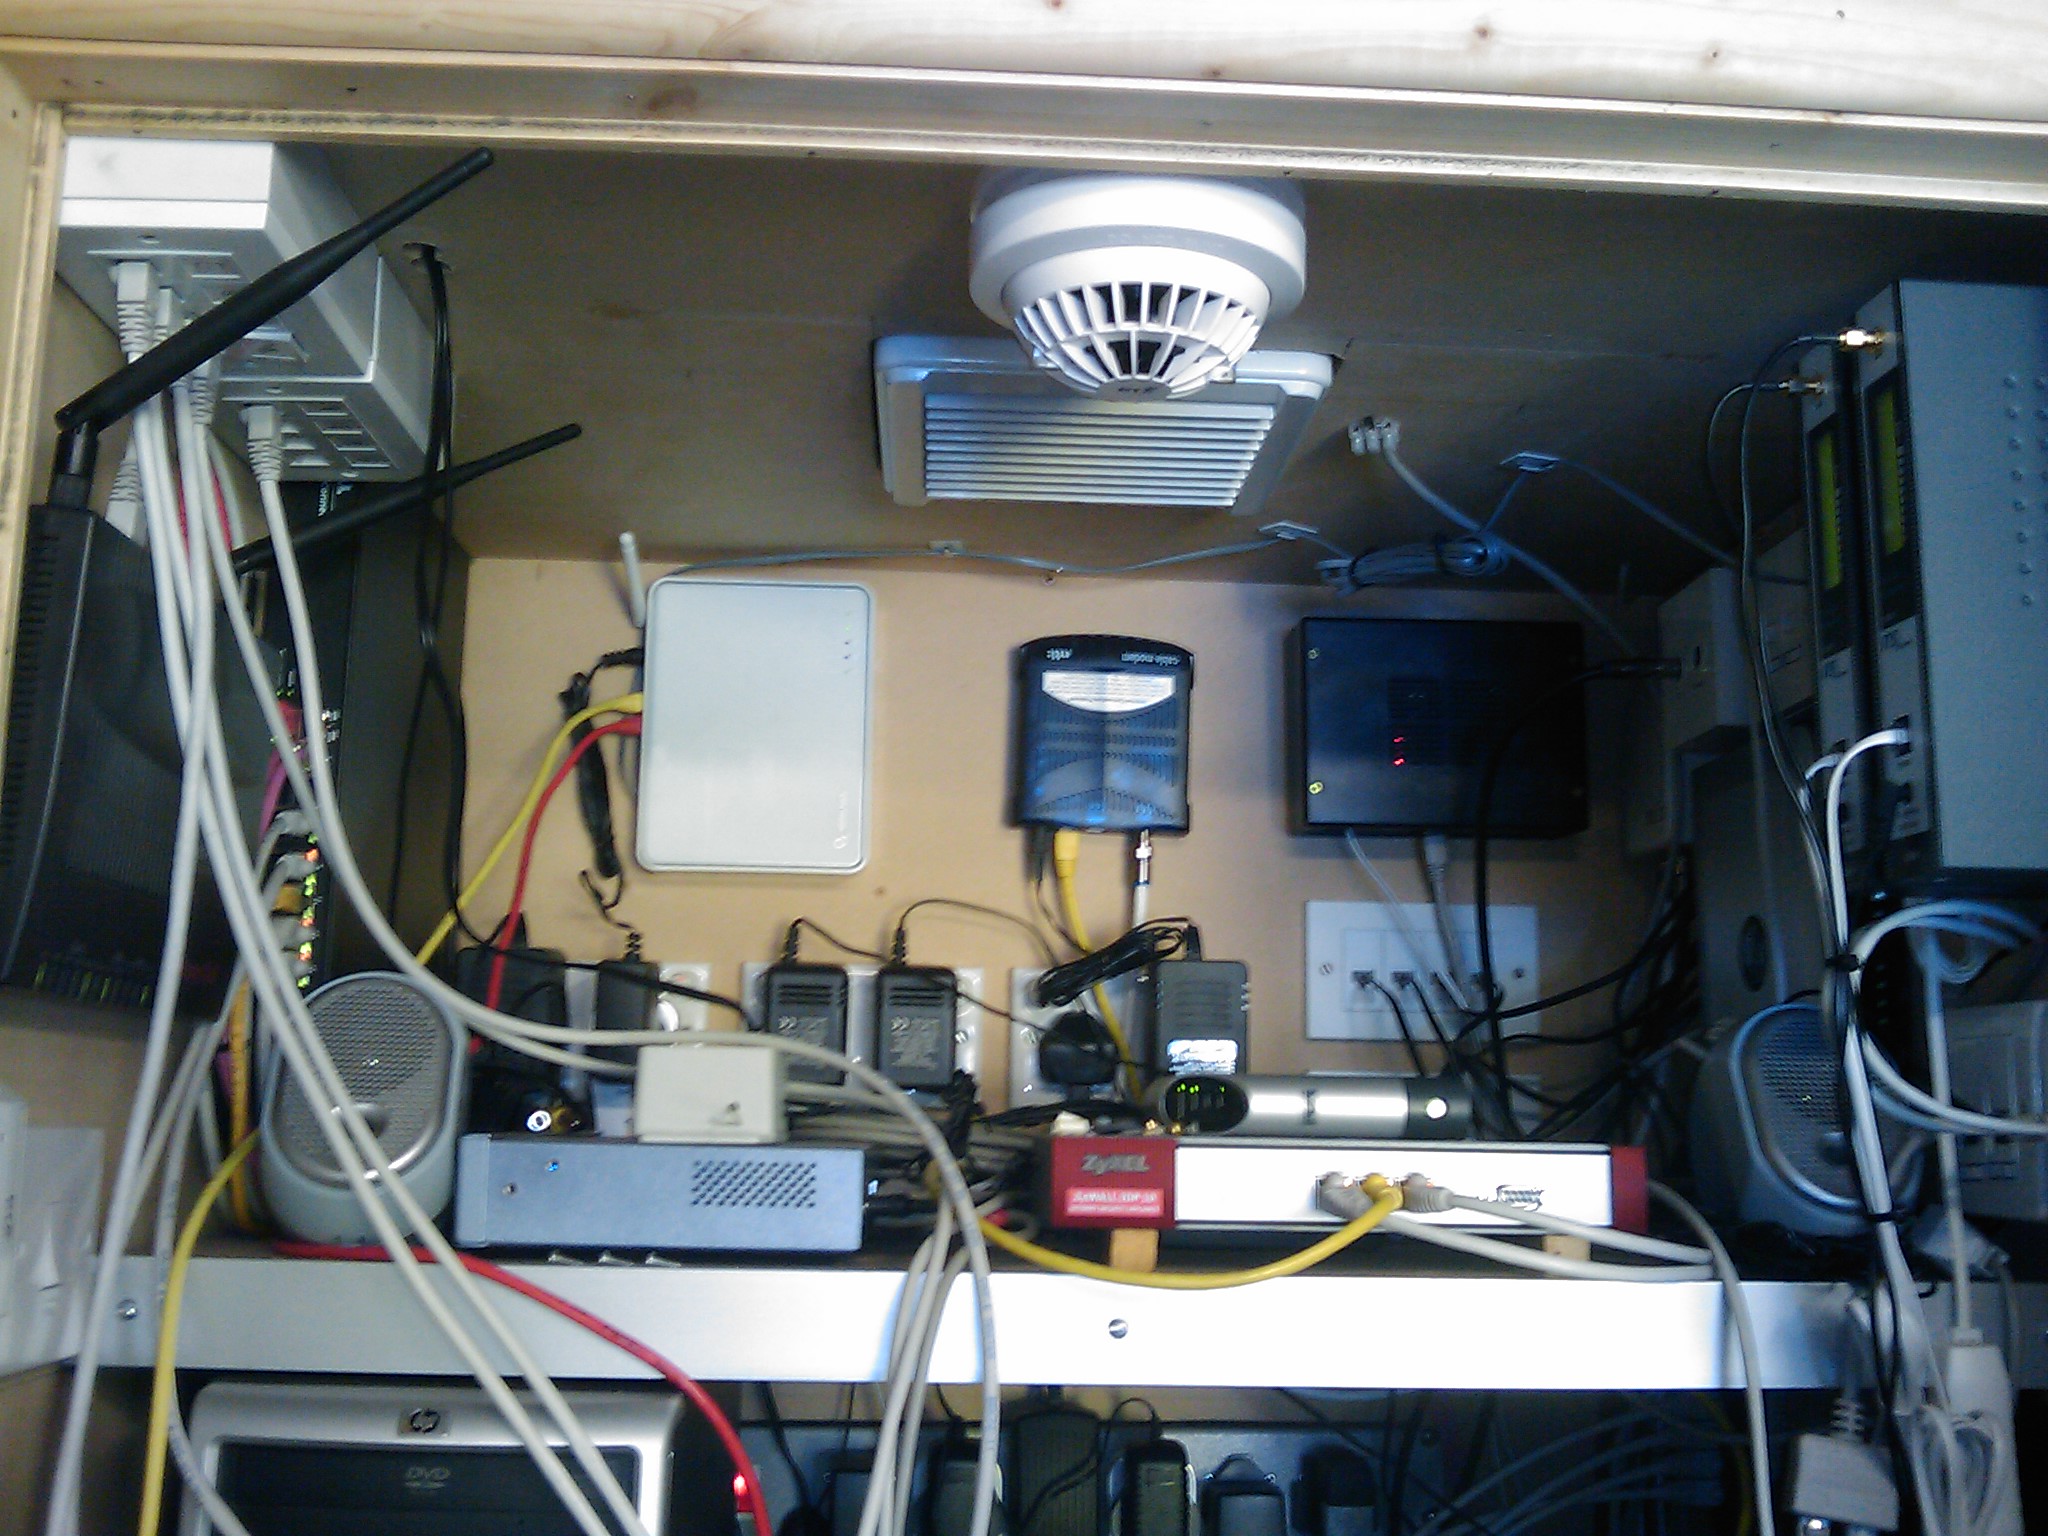
Finally, the top of the rack is shown here. From the left, there’s a Draytek Vigor Router, a Dell PowerConnect Gigabit Smart Switch (soon to be replaced with another Netgear – can you tell I’m a Netgear fan?), an RS232 <-> Ethernet Gateway, an O2 ADSL Modem, an NTL Cable Modem, a ZyXEL ZyWall IDS, a xAP Netiom, a Linksys NSLU2 running OPNMax, a Linksys 8 port FXO Gateway and the two GSM <-> PSTN Gateways. The Dell network switch connects equipment in the external network (DMZ) and the Draytek Router provides internet access over NTL Cable and O2 ADSL. The RS232 <-> Ethernet Gateway connects various serial devices to the network and the Linksys FXO Gateway brings standard PSTN telephones (via CAT5 to / from the house) over SIP to the Asterisk PBX. The IDS provides monitoring and alerts of suspicious internet activity and I’m currently experimenting with the OPNMax as a secondary central HA control to complement xAP Floorplan. The xAP Netiom is used to bring various hardwired sensors / switches / etc onto the xAP network.
So that’s about it for Node Zero, just don’t ask me about my electric bill!! There’s still a few ongoing changes to be made, as mentioned the main DC server is due to be virtualised and the server that previously provided PVR functions is being retired and replaced by a low power NAS, so these should bring the power consumption down some what. As with many UKHAers, there’s many an un-finished project here, the to-do list never seems to grow any shorter, but I guess that we wouldn’t have it any other way 🙂
Thanks for reading,
Martyn Wendon